Search Our Site
")


Gumerflat.
A 300m de la Puerta del Sol
Alojamiento en Madrid, a 100 metros de la Fnac y a 300 metros de la Puerta del Sol. El apartamento se encuentra a 700 metros de la Plaza Mayor de Madrid y proporciona conexión WiFi gratuita en todas sus instalaciones.
La Latina.
Alójate en el corazón de Madrid
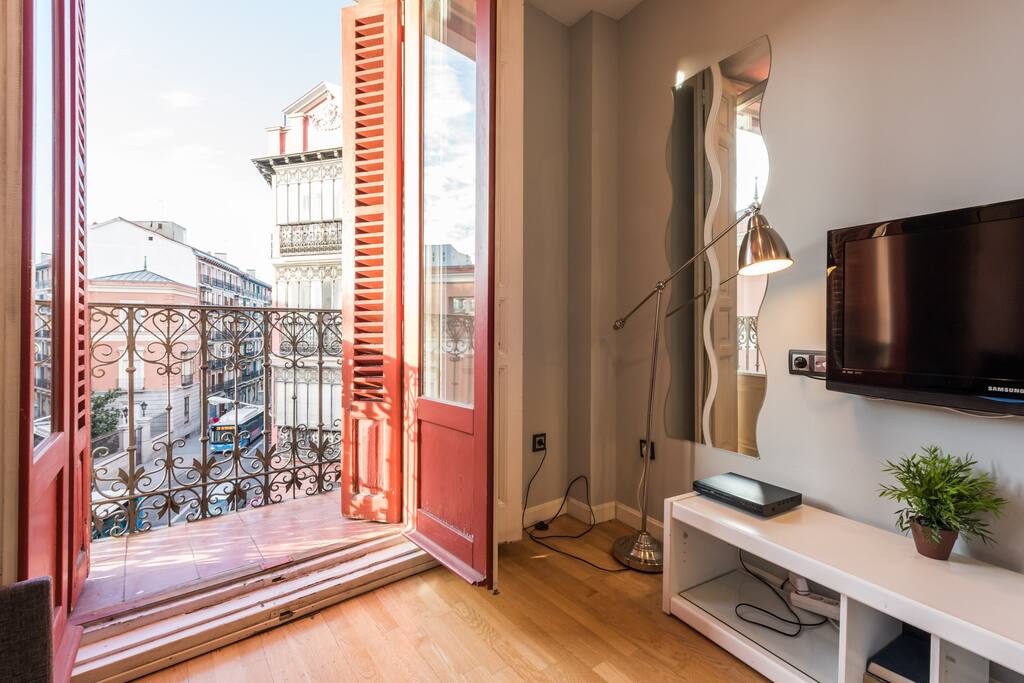
Recién reformado, al inicio del barrido de La Latina, y a 100 metros de la Plaza Mayor.Apartamento exterior que oferece mucha luz y preciosas vistas desde su balcón.
Muy Cerca de la Plaza Mayor
El centro de Madrid es una opción genial para los viajeros interesados en salir de noche, comer tapas, la arquitectura...Nuestros clientes dicen que esta parte de Madrid es su favorita, según los comentarios independientes.

GUMERFLAT - CENTRICAL APARTMENT
Madrid, Comunidad de Madrid, España
Apartamento decorado con un estilo elegante y acogedor, muy tranquilo y luminoso, situado en la zona privilegiada del centro de Madrid, entre Sol y Gran Vía, una ubicación perfecta y el sitio ideal...
CENTRICAL APARTMENT IN "LA LATINA"-"PLAZA MAYOR"
Madrid, Comunidad de Madrid, España
Apartamento recién reformado, al inicio del barrido de La Latina, y a 100 metros de la Plaza Mayor. Apartamento exterior que oferece mucha luz y preciosas vistas desde su balcón. Te permite ir an...

Gumerflat.
Todo al alcance de la mano
Las distancias se acortan desde Gumerflat Coverse, Por ejemplo, el Teatro Real esta a 400m, tan sólo 6 minutos a pie. Ver Disponibilidad

Gran Vía
¡A sólo 2 minutos!- 142m a pie -

Puerta del Sol
¡A sólo 4 minutos!- 286m a pie -

Conéctate con todo Madrid
Dispones de varias estaciones de metro muy cercanas para poder ir a cualquier parte de Madrid.Ver Disponibilidad

Callao
¡A sólo 2 minutos!- 140m a pie -

Sol
¡A sólo 3 minutos!- 240m a pie -

La Latina.
No hay distancias.
A sólo 100 metros de la Plaza Mayor estarás rodeado de los restaurantes más bohemios de la ciudad.Ver Disponibilidad

Teatro Calderón
¡A sólo 4 minutos!- 280m a pie -

Puerta del Sol
¡A sólo 7 minutos!- 500m a pie -
Note - The tool tips script is by default disabled. If you wish to use it you must enable this script in the template's configuration area. This also includes site shaper installations.
Demo 1:

Demo 2:
Demo 2 Image Tool Tip
Demo 3:
Demo 3 Image Tool Tip
This template comes loaded with options that you can use to customize your site exactly how you want it. Here's how to get to these custom settings:
- 01In the backend of Joomla go menu item Extensions/Template Manager.
- 02Click on the title of the template.
- 03This will bring you to the template manager screen where you can edit the template's parameters.
- 04Click save when you are done
I like what I see! I want to JOIN TODAY.
This template is built on the very powerful S5 Vertex Framework, which comes packed with amazing features! Learn More About Vertex...
Every template built on Vertex also comes with its own unique template specific options applicable to that particular template such as highlight colors, social icons, and much more. These features are in addition to the standard functions of Vertex, and are still controlled through the very user friendly interface of Vertex. This page will document the features specific to this template.


When the button in the controller area is clicked the S5 Quick Contact opens in an overlay screen that covers the site.
You can also open the S5 Quick Contact by adding onclick="s5_custom_7_open()" to any element. Click on the Reserve Now button below for an example.
Setup Process:
1. Publish the S5 Quick Contact module to the custom_7 position to all pages. This will not actually show on the page, this position is only contained in the overlay area that covers the site when triggered. Configure the module as desired.
2. Publish the controller code to any module position in a custom html module, on the demo it is published to custom_3 position.
3. In the template configuration you need to define which fields from the S5 Quick Contact module that you would like to show in the controller area. Enter the number of the fields you would like to show separated by commas. For example if I want to show the second, fifth and seventh fields, I would enter 2,5,7 in this field.

4. If you would like to add a button that opens the overlay area you can simply add onclick="s5_custom_7_open()" to any element. The Reserve Now button shown above uses the following code:
Every template built on Vertex also comes with its own unique template specific options applicable to that particular template such as highlight colors, social icons, and much more. These features are in addition to the standard functions of Vertex, and are still controlled through the very user friendly interface of Vertex. This page will document the features specific to this template.
Template Specific Configuration Interface of Vertex
Below is a screenshot that shows all the template specific features available in the user friendly Vertex admin:
Custom Highlight Colors
Stylize your site with any color you want. Set your own custom color scheme with the built in highlight colors. These control menu items, titles, buttons, hover over effects, backgrounds, and much more. You can set this color to any color that you want. Below is an example so you can see how this works.
Custom Highlight Font
Choose a custom highlight font powered by Google fonts. You can set a custom font for the titles, buttons, and much more. This is used in conjunction with the default site font which is controlled under the Layout tab of Vertex, and controls many other elements as well.
Uppercase Letters
Choose to enable or disable uppercase letters on most menu items, buttons, titles and more.
Hide First Menu Item and Arrows
With this option you can disable the first menu item and also the sub menu arrows.
S5 Quick Contact Popup and Controller
The S5 Quick Contact is heavily customized to work with this template for reservations. Along with the module there is a controller area, which allows the user to first select a few inputs and then those inputs are passed into the S5 Quick Contact module to complete the form and submit it. That controller is shown below:When the button in the controller area is clicked the S5 Quick Contact opens in an overlay screen that covers the site.
You can also open the S5 Quick Contact by adding onclick="s5_custom_7_open()" to any element. Click on the Reserve Now button below for an example.
What Are You Waiting For? Reserve Now
Setup Process:
1. Publish the S5 Quick Contact module to the custom_7 position to all pages. This will not actually show on the page, this position is only contained in the overlay area that covers the site when triggered. Configure the module as desired.
2. Publish the controller code to any module position in a custom html module, on the demo it is published to custom_3 position.
<div id="s5_quick_contact_controller">
<a class="readon" onclick="s5_custom_7_open()">Check Room Availability</a>
</div>
<a class="readon" onclick="s5_custom_7_open()">Check Room Availability</a>
</div>
3. In the template configuration you need to define which fields from the S5 Quick Contact module that you would like to show in the controller area. Enter the number of the fields you would like to show separated by commas. For example if I want to show the second, fifth and seventh fields, I would enter 2,5,7 in this field.
4. If you would like to add a button that opens the overlay area you can simply add onclick="s5_custom_7_open()" to any element. The Reserve Now button shown above uses the following code:
<div class="highlight1_block_outer">
<div class="highlight1_block">
<span>What Are You Waiting For?</span> <a onclick="s5_custom_7_open()" class="readon">Reserve Now</a>
</div>
</div>
<div class="highlight1_block">
<span>What Are You Waiting For?</span> <a onclick="s5_custom_7_open()" class="readon">Reserve Now</a>
</div>
</div>
All content and images shown on this site is for demo, presentation purposes only. This site is intended to exemplify a live website and does not make any claim of any kind to the validity of non-Shape5 content, images or posts published. Stock photography and icons are often purchased from shutterstock.com for this demo only, and is not included with this template. Occasionally open source images are used as well, but are also not included, eg: unsplash.com. You may not use these items for your own use without first purchasing them from their copyright owner. Links will be provided for some of these items if you wish to purchase them from their copyright owners or download them from their sources.
So what are Site Shapers? They are quick installs of Joomla combined with all the modules, content, etc used on our demo, excluding stock photography. Within a few minutes you can have your site up, running and looking just like our demo. No more importing SQL dumps and installing modules. Just head on over to the download section of this template and grab a Site Shaper. Simply install the Site Shaper like any other Joomla installation, it's that easy!
How to setup a Site Shaper
- 01Login to your cpanel or your server admin panel.
- 02Locate the area where your databases are (usually labeled Mysql Databases)
- 03Create a new database
- 04Next create a new database user and assign it to this newly created database in the previous step
- 05You will then need to extract the site shaper to either a folder on your server or the root directory such as WWW. NOTE: if you already have a website in the root of your WWW folder, we suggest creating a new folder and extract the site shaper there. If your cpanel does not have an extract option or you cannot find it, you may also extract the contents of your site shaper in to a folder on your desktop and upload all the files via an ftp client to your server.
- 06Next, navigate to the url where you extracted the site shaper via your web browser.
- 07Continue through each screen until you reach the below screenshot:
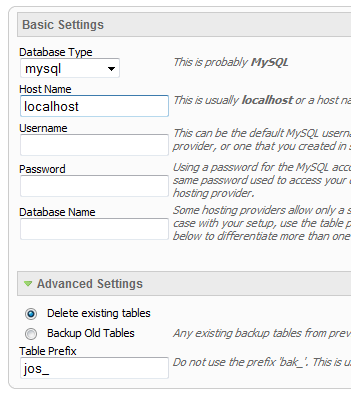
- 08At the above screen be sure to enter localhost as shown, continue to fill in the following text fields with your newly created database and username information
- 09Follow through the rest of the site shaper setup and click the install sample data at the last screen and the installation is complete! (be sure to rename/remove the installation directory after finishing the install)
ContÁctANOS
Contáctanos
Reservas
Gracias por contactar con nosotros! Por favor, rellene el siguiente formulario y nuestro personal se pondrá en contacto con usted lo antes posible.